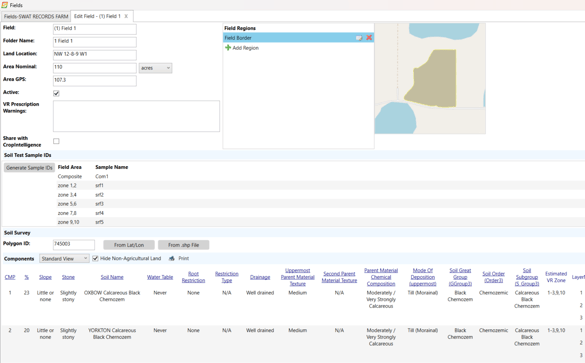
Add a New Field (Desktop)
Once you have your farm added you can now add your fields. Go into your created farm then follow these steps;
- In the left hand menu, click on Fields
- Click on Add Field

- Enter in your field name (Recommended to number fields in order starting at one, this will help with auto populating your sample ID's for SWAT MAPS, and easily identifying fields)
- The folder name will be auto-populated as the Field Name. (Special Characters will be removed)
- Add a Land Location if applicable
- Enter in the nominal acres
- This value is typically larger than the field acres as it is used for things like fertilizer forecasting.
- GPS Acres (will be adjusted when your SWAT MAPS are made)
- Generate your Sample ID's (If using for SWAT MAPS)
- Optional: You can add a boundary in the Field Regions by selecting the .SHP of a shapefile.
- Once you're done, you can close this tab and add more fields if needed.
- Once completed, continue to Assign Crop(s) to field(s)
- If the field is needing to be SWAT MAPPED continue to Mapping Logistics
- If the field is needing to be Soil Sampled continue to Soil Sampling Logistics(Mobile) or Soil Sampling Logistics (Desktop)
Note: The Active button is used to hide the field from lists. You would deselect this Active button if the farm will no longer be farming this field. It will keep all the records and files of the fields, but it will hide it from any pick lists throughout SWAT RECORDS.
Example Field:
